Tag: baking recipes

  • 10 Best Challah Bread Recipes

    10 Best Challah Bread Recipes

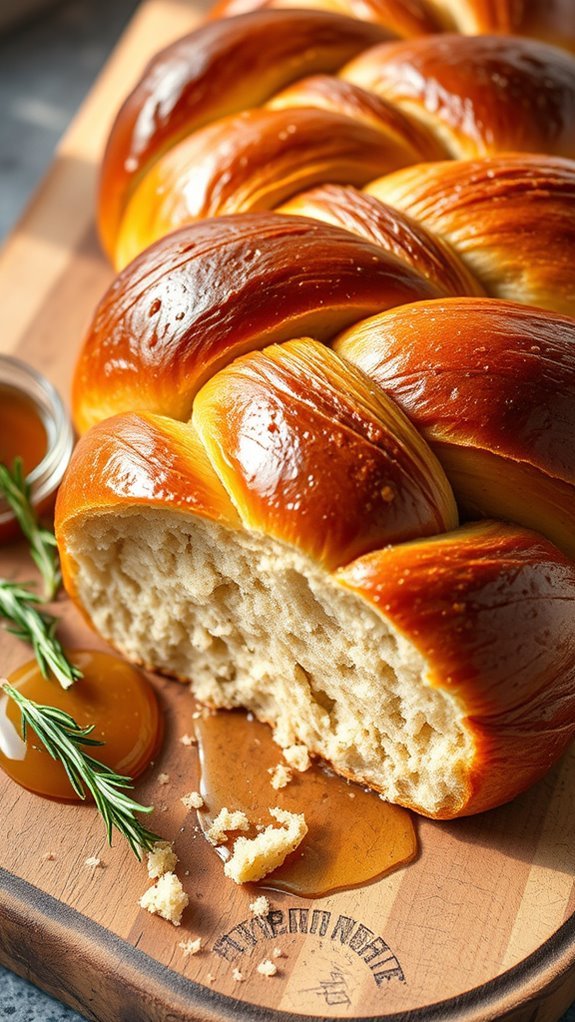
    Challah bread is a delicious treat that can be enjoyed in so many ways. You’ve got the classic braided version, which is a staple for any gathering, but there are also fun twists like sweet cinnamon raisin or even savory garlic parmesan. Whether you’re a seasoned baker or just starting out, these recipes have something for everyone. Curious to discover the best ones? Let’s investigate the top ten that’ll make your taste buds sing!

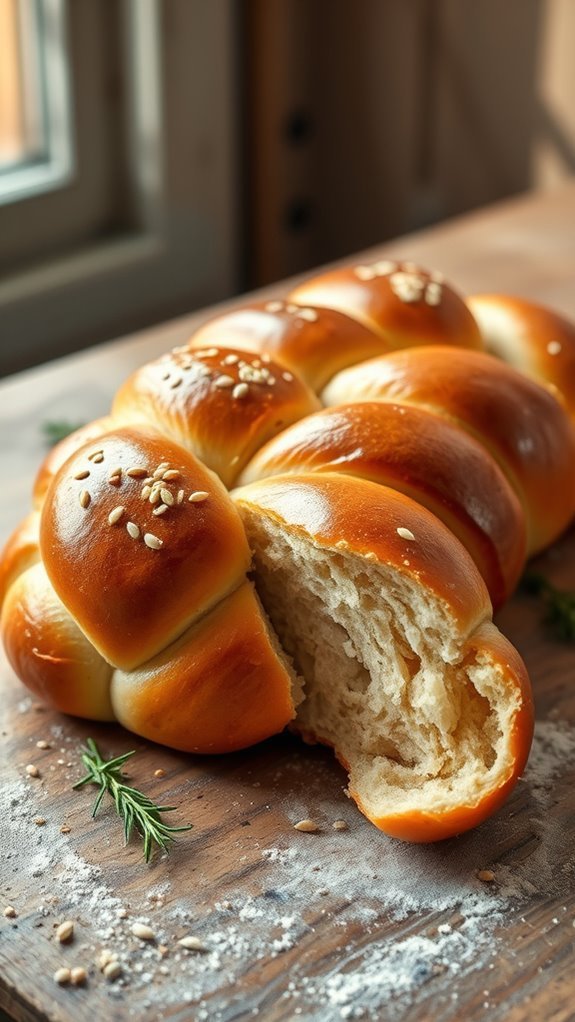
    Classic Braided Challah

    Classic braided challah is a beautiful and delicious bread that’s perfect for special occasions or simply to enjoy with family and friends. This traditional Jewish bread is known for its rich flavor and fluffy texture, making it an excellent choice for dipping in honey, serving with a meal, or enjoying on its own.

    The braided shape not only adds to its visual appeal but also creates a delightful crust. Follow this classic recipe to create your own challah that will impress everyone at the table.

    Ingredients:

    • 4 cups all-purpose flour
    • 1/4 cup granulated sugar
    • 1 packet (2 1/4 teaspoons) active dry yeast
    • 1 teaspoon salt
    • 1 cup warm water (about 110°F)
    • 1/4 cup vegetable oil
    • 2 large eggs
    • 1 egg yolk (for egg wash)
    • 1 tablespoon water (for egg wash)

    Instructions:

    In a large mixing bowl, combine the warm water, yeast, and sugar, letting it sit for about 5-10 minutes until it becomes frothy.

    In another bowl, whisk together the flour and salt. Once the yeast mixture is ready, add the oil and eggs to the bowl, mixing well. Gradually incorporate the flour mixture until a dough forms.

    Knead the dough on a lightly floured surface for about 10 minutes until it becomes smooth and elastic. Place the dough in a greased bowl, cover it with a damp cloth, and let it rise in a warm spot for about 1-2 hours or until it has doubled in size.

    After rising, punch down the dough and divide it into three equal pieces. Roll each piece into long strands and braid them together, tucking the ends under.

    Place the braided dough on a greased baking sheet, cover, and let it rise for another 30-45 minutes. Preheat your oven to 375°F.

    For the egg wash, mix the egg yolk with a tablespoon of water and brush it over the dough. Bake for 25-30 minutes or until the bread is golden brown and sounds hollow when tapped on the bottom.

    Let it cool on a wire rack before slicing.

    Extra Tips:

    For an even more flavorful challah, consider adding ingredients like sesame seeds or poppy seeds on top before baking.

    You can also experiment with different flavors by incorporating honey, cinnamon, or dried fruits into the dough. Be sure to adjust the rising times based on the temperature of your kitchen; a warmer environment will speed up the process, while a cooler one may slow it down.

    Finally, for a sweeter challah, you can increase the sugar slightly or serve with a side of honey or jam for added flavor. Enjoy your freshly baked challah as part of your family traditions or as an accompaniment to any meal!

    Sweet Cinnamon Raisin Challah

    cinnamon raisin braided bread

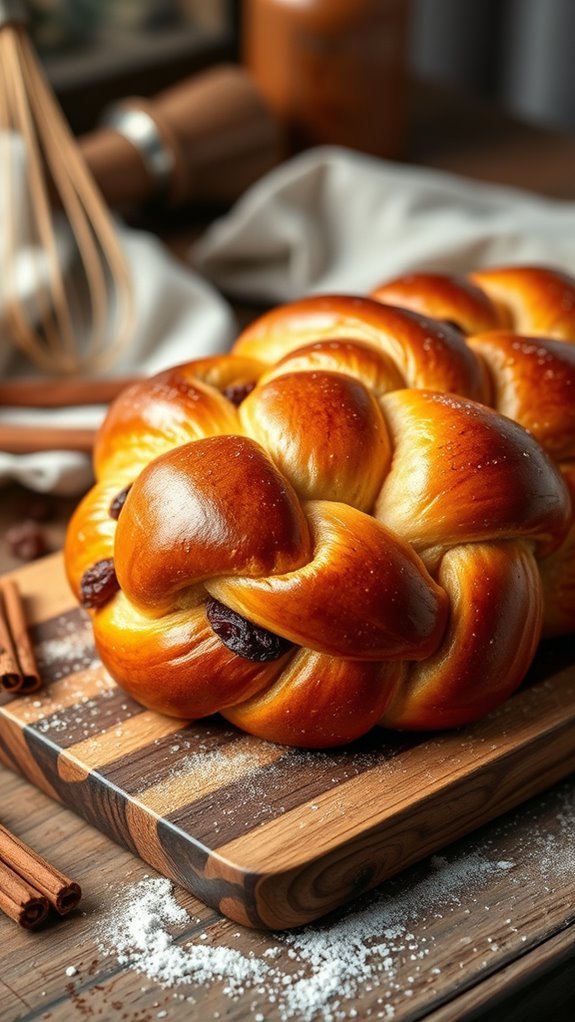
    Sweet Cinnamon Raisin Challah is a delightful twist on the traditional braided bread, perfect for breakfast, dessert, or even a comforting snack. This recipe combines the rich, sweet flavors of cinnamon and raisins with the soft, fluffy texture of challah. It’s an ideal treat for special occasions or family gatherings, and the aroma that fills your kitchen while it bakes is simply irresistible.

    Ingredients:

    • 4 cups all-purpose flour
    • 1/2 cup sugar
    • 1 packet (2 1/4 tsp) active dry yeast
    • 1 tsp salt
    • 1/4 cup vegetable oil
    • 1 cup warm water (about 110°F)
    • 3 large eggs
    • 1 cup raisins
    • 2 tsp ground cinnamon
    • 1 egg (for egg wash)
    • Extra sugar and cinnamon for sprinkling

    To make the Sweet Cinnamon Raisin Challah, begin by activating the yeast by mixing it with warm water and a pinch of sugar in a bowl; let it sit for about 5-10 minutes until frothy.

    In a large mixing bowl, combine the flour, sugar, salt, and ground cinnamon. Make a well in the center and add the activated yeast mixture, vegetable oil, and 2 eggs. Mix until a dough forms, then knead for about 8-10 minutes until smooth and elastic.

    Incorporate the raisins into the dough during the final few minutes of kneading. Place the dough in a greased bowl, cover with a damp cloth, and let it rise in a warm area for about 1-1.5 hours, or until doubled in size.

    Once risen, punch down the dough and divide it into three equal pieces. Roll each piece into a long rope and braid them together. Place the braided loaf on a baking sheet lined with parchment paper, cover again, and let it rise for another 30-45 minutes.

    Preheat your oven to 350°F (175°C). Brush the dough with the remaining beaten egg, and sprinkle a mixture of sugar and cinnamon on top. Bake for 25-30 minutes or until golden brown and hollow-sounding when tapped on the bottom. Allow to cool before slicing.

    When making Sweet Cinnamon Raisin Challah, be sure not to rush the rising times, as they’re essential for achieving that fluffy texture.

    If you want to improve the flavor, consider soaking the raisins in warm water or rum for 15 minutes before adding them to the dough. You can also experiment with different spices like nutmeg or add chopped nuts for extra crunch.

    Finally, this bread stores well in an airtight container and can be frozen, making it convenient for future enjoyment.

    Chocolate Chip Challah

    Chocolate Chip Challah is a delightful twist on the traditional Jewish bread, perfect for those who enjoy a touch of sweetness in their baked goods. This rich, braided loaf isn’t only visually stunning but also incredibly delicious, featuring pockets of chocolate chips that melt into the buttery dough. Ideal for breakfast, brunch, or dessert, this recipe will surely become a favorite in your home.

    Ingredients:

    • 4 cups all-purpose flour
    • 1/4 cup granulated sugar
    • 1 tablespoon active dry yeast
    • 1 teaspoon salt
    • 1/2 cup warm water (about 110°F)
    • 1/2 cup milk (or dairy-free alternative)
    • 1/4 cup unsalted butter (or margarine), melted
    • 3 large eggs
    • 1 cup semi-sweet chocolate chips
    • 1 egg (for egg wash)

    Instructions:

    To prepare the Chocolate Chip Challah, start by combining the warm water, yeast, and a pinch of sugar in a bowl; let it sit for about 5-10 minutes until frothy.

    In a large mixing bowl, whisk together the flour, remaining sugar, and salt. In a separate bowl, mix the milk, melted butter, and eggs.

    Combine the yeast mixture and the milk mixture, then gradually add this to the flour mixture, mixing until a dough forms. Knead the dough on a floured surface for about 8-10 minutes until smooth and elastic.

    Incorporate the chocolate chips, then shape the dough into a ball and place it in a greased bowl. Cover and let it rise in a warm area for 1-2 hours, or until doubled in size.

    Once risen, punch down the dough, divide it into three equal pieces, roll each piece into a long strand, and braid them together.

    Place the braided dough on a baking sheet lined with parchment paper, cover, and let it rise again for about 30-45 minutes. Preheat the oven to 375°F.

    Brush the challah with beaten egg for a glossy finish, then bake for 25-30 minutes or until golden brown. Allow it to cool before slicing.

    Extra Tips:

    For the best flavor and texture, make sure your ingredients are at room temperature before starting.

    If you prefer a sweeter loaf, you can add more chocolate chips or sprinkle some on top before baking.

    To improve the richness, consider adding a teaspoon of vanilla extract to the wet ingredients.

    If you want to make the dough ahead of time, you can refrigerate it after the first rise for up to 24 hours; just allow it to come back to room temperature before braiding.

    Enjoy your Chocolate Chip Challah fresh or toasted with butter for a delicious treat!

    Honey Whole Wheat Challah

    honey infused whole wheat bread

    Honey whole wheat challah is a delicious and wholesome twist on the traditional Jewish bread. Made with whole wheat flour and sweetened with honey, this bread boasts a nutty flavor and a slightly denser texture, while still maintaining the signature soft and fluffy qualities of challah.

    Perfect for Shabbat, holidays, or any special occasion, this honey whole wheat challah isn’t only tasty but also contributes a touch of warmth and comfort to your dining table.

    Ingredients:

    • 3 cups whole wheat flour
    • 1 cup all-purpose flour
    • 1/4 cup honey
    • 1/4 cup olive oil
    • 1 teaspoon salt
    • 1 packet (2 1/4 teaspoons) active dry yeast
    • 1 cup warm water (about 110°F)
    • 2 large eggs (plus 1 for egg wash)
    • Sesame or poppy seeds for topping (optional)

    Instructions:

    In a large mixing bowl, combine the warm water and yeast, allowing it to sit for about 5 minutes until frothy.

    Next, add the honey, olive oil, and eggs to the yeast mixture, stirring until well combined. Gradually mix in the whole wheat flour and salt, followed by the all-purpose flour, until a dough forms.

    Knead the dough on a floured surface for about 8-10 minutes until it becomes smooth and elastic. Place the dough in a greased bowl, cover it with a clean kitchen towel, and let it rise in a warm place for about 1-2 hours or until doubled in size.

    Once risen, punch down the dough and divide it into three equal pieces. Roll each piece into a long rope and braid them together.

    Place the braided challah on a lined baking sheet, cover, and let it rise again for 30-45 minutes. Preheat your oven to 350°F (175°C).

    Brush the challah with the reserved beaten egg and sprinkle with seeds if desired. Bake for 30-35 minutes until golden brown and hollow-sounding when tapped on the bottom. Let cool on a wire rack before slicing.

    Extra Tips:

    To improve the flavor of your honey whole wheat challah, consider adding spices like cinnamon or nutmeg to the dough.

    If you prefer a sweeter bread, you can increase the amount of honey slightly. Make sure your water is warm but not hot to prevent killing the yeast.

    For an even richer color, brush the challah with egg wash a second time halfway through baking. This bread can also be frozen; just wrap it tightly in plastic wrap and foil to preserve its freshness.

    Enjoy your homemade challah with butter, jam, or as the base for delicious French toast!

    Savory Herb Challah

    Savory Herb Challah is a delightful twist on the traditional sweet challah bread, infused with aromatic herbs that enhance its flavor profile. This bread is perfect for accompanying a savory meal, serving as a base for sandwiches, or simply enjoying with olive oil and balsamic vinegar.

    The herbs not only add a fragrant touch but also give the bread a beautiful texture and taste that appeals to both herb lovers and those looking for a new take on a classic.

    Ingredients:

    • 4 cups all-purpose flour
    • 1 packet (2 ¼ teaspoons) active dry yeast
    • 1 teaspoon sugar
    • 1 ½ teaspoons salt
    • 1 cup warm water (about 110°F)
    • ¼ cup olive oil
    • 2 tablespoons fresh rosemary, finely chopped
    • 2 tablespoons fresh thyme, finely chopped
    • 2 tablespoons fresh parsley, finely chopped
    • 1 egg (for egg wash)
    • Sea salt (for sprinkling)

    Cooking Instructions:

    In a large mixing bowl, combine the warm water, sugar, and yeast, allowing it to sit for about 5-10 minutes until frothy.

    Once activated, add the olive oil, salt, and flour gradually, mixing until a dough forms. Knead the dough on a floured surface for about 8-10 minutes until smooth and elastic. Incorporate the chopped herbs during the final few minutes of kneading.

    Place the dough in a greased bowl, cover it with a damp cloth, and let it rise in a warm place for about 1-2 hours, or until it doubles in size.

    Once risen, punch down the dough and divide it into three equal pieces, rolling each into a long strand. Braid the strands together and place the braided loaf on a lined baking sheet.

    Allow it to rise for another 30-45 minutes, then brush the top with the beaten egg and sprinkle with sea salt. Bake in a preheated oven at 375°F for 25-30 minutes or until golden brown. Cool on a wire rack before slicing.

    Extra Tips:

    For the best flavor, use fresh herbs, but dried herbs can be substituted in a pinch—just use about one-third of the amount.

    If you want to add even more depth to the flavor, consider mixing in some grated cheese like Parmesan or a sprinkle of garlic powder.

    Be mindful of the dough’s hydration; if it’s too sticky, add a little more flour during kneading, but avoid adding too much to keep the texture light.

    Ultimately, this bread can be frozen; simply wrap it well after cooling and thaw at room temperature when ready to enjoy.

    Orange Zest Challah

    citrus flavored braided bread

    Orange Zest Challah is a delightful twist on the traditional Jewish bread that brings a burst of citrus flavor to the classic recipe. The addition of orange zest not only brightens the bread’s taste but also adds a revitalizing aroma, making it perfect for special occasions or as a sweet treat any day of the week.

    The soft, slightly sweet dough is braided to create an impressive loaf that’s sure to impress family and friends.

    Ingredients:

    • 4 cups all-purpose flour
    • 1/4 cup granulated sugar
    • 1 packet (2 1/4 tsp) active dry yeast
    • 1 cup warm water (110°F)
    • 1/4 cup vegetable oil
    • 3 large eggs
    • Zest of 1 large orange
    • 1 tsp salt
    • 1 egg (for egg wash)

    Instructions:

    In a large mixing bowl, combine the warm water and yeast, letting it sit for about 5 minutes until frothy.

    Next, add the sugar, vegetable oil, eggs, orange zest, and salt, mixing until well combined. Gradually add the flour, one cup at a time, kneading the dough until it becomes smooth and elastic, about 8-10 minutes.

    Place the dough in a greased bowl, cover it with a cloth, and let it rise in a warm place until it has doubled in size, approximately 1-2 hours.

    Once risen, punch down the dough and divide it into three equal parts. Roll each piece into a long rope and braid them together.

    Place the braided dough on a baking sheet lined with parchment paper, cover it again, and let it rise for another 30-45 minutes.

    Preheat the oven to 350°F, then brush the loaf with the egg wash and bake for 25-30 minutes until golden brown.

    Extra Tips:

    For the best results, verify your water is at the right temperature to activate the yeast—too hot can kill it, while too cold won’t activate it properly.

    If you want a deeper orange flavor, consider adding a tablespoon of orange juice to the dough.

    Allow the bread to cool completely before slicing to maintain its texture. This Challah can also be frozen after baking, so you can enjoy it later—just let it cool completely, wrap it tightly, and store it in an airtight container.

    Maple Pecan Challah

    sweet nutty braided bread

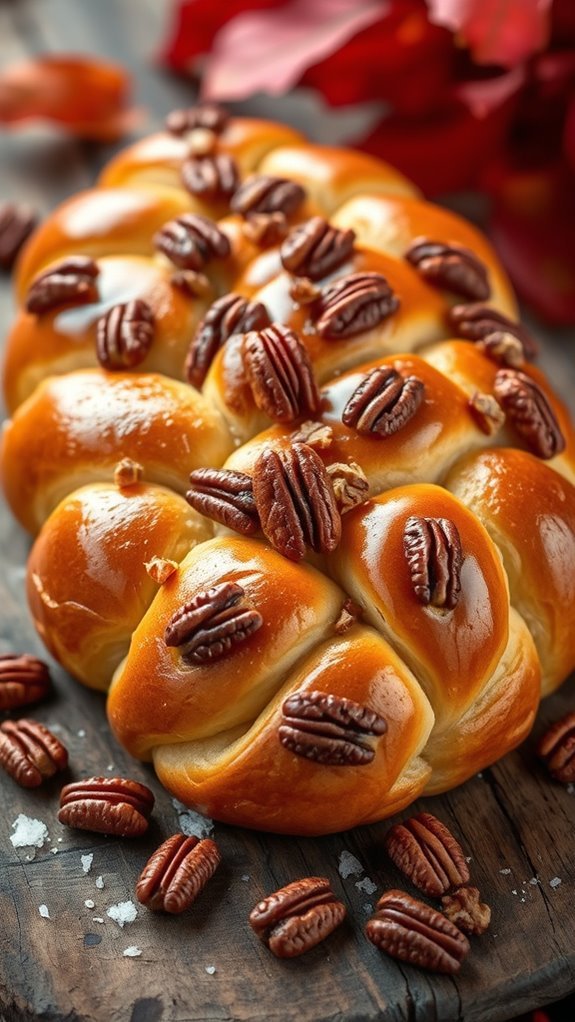
    Maple Pecan Challah is a delightful twist on the traditional Jewish bread, infusing the rich flavors of maple syrup and toasted pecans into the soft, braided dough. This sweet bread is perfect for breakfast, brunch, or as a special treat during holidays. The combination of maple and nutty pecans creates a comforting aroma that fills your kitchen, making it a wonderful addition to any gathering.

    Ingredients:

    • 4 cups all-purpose flour
    • 1/4 cup granulated sugar
    • 2 teaspoons active dry yeast
    • 1 teaspoon salt
    • 1 cup warm water (110°F)
    • 1/4 cup maple syrup
    • 1/4 cup vegetable oil
    • 3 large eggs
    • 1 cup chopped pecans (toasted)
    • 1 egg (for egg wash)
    • 2 tablespoons maple syrup (for glaze)

    Instructions:

    In a large mixing bowl, combine the warm water, yeast, and 1 tablespoon of sugar, allowing it to sit for about 5 minutes until frothy.

    Add the remaining sugar, maple syrup, vegetable oil, and eggs, whisking until well combined. Gradually mix in the flour and salt, kneading the dough on a floured surface until it becomes smooth and elastic, about 8-10 minutes.

    Once the dough is ready, incorporate the toasted pecans, then place the dough in a greased bowl, cover it with a damp cloth, and let rise in a warm place until doubled in size, about 1 hour.

    After rising, punch down the dough and divide it into three equal parts. Roll each part into a long strand and braid them together.

    Place the braided dough on a baking sheet lined with parchment paper, cover it, and let it rise again for about 30 minutes. Preheat your oven to 350°F.

    Brush the top of the braided dough with a beaten egg and bake for 25-30 minutes until golden brown. Once out of the oven, brush the top with maple syrup for a sweet glaze.

    Extra Tips:

    To guarantee your Maple Pecan Challah has the perfect texture, make sure your water is warm but not hot when activating the yeast, as too high a temperature can kill the yeast.

    If you want to improve the flavor, consider adding a dash of cinnamon to the dough or sprinkling some on top before baking.

    For added moisture, store your bread wrapped in plastic wrap once it cools completely, and enjoy it within a few days, or freeze it for longer storage.

    Garlic Parmesan Challah

    garlic infused cheesy bread

    Garlic Parmesan Challah is a delicious twist on the traditional braided bread, combining the rich flavors of garlic and savory Parmesan cheese to create a delightful addition to any meal.

    This recipe results in a soft, fluffy loaf that’s perfect for tearing apart and sharing with family and friends. Whether enjoyed fresh out of the oven or toasted for a delightful breakfast, this garlic-infused challah is sure to become a favorite in your home.

    Ingredients:

    • 4 cups all-purpose flour
    • 1 packet (2 ¼ teaspoons) active dry yeast
    • 1 cup warm water (110°F)
    • 1/4 cup sugar
    • 1/4 cup olive oil
    • 1 teaspoon salt
    • 4 cloves garlic, minced
    • 1/2 cup grated Parmesan cheese
    • 1 egg (for egg wash)
    • Fresh parsley, chopped (for garnish)

    Instructions:

    In a large mixing bowl, dissolve the yeast and sugar in warm water and let it sit for about 5 minutes until it becomes frothy.

    Add the olive oil, salt, minced garlic, and half of the flour, mixing until combined. Gradually add the remaining flour, kneading the dough on a floured surface for about 10 minutes until it’s smooth and elastic.

    Place the dough in a greased bowl, cover it with a damp cloth, and let it rise in a warm place for about an hour, or until it doubles in size.

    Once risen, punch down the dough, and incorporate the grated Parmesan cheese. Divide the dough into three equal pieces, roll them into long strands, and braid them together.

    Place the braided dough on a greased baking sheet, cover, and let it rise for another 30 minutes. Preheat your oven to 375°F.

    Brush the top of the challah with the beaten egg and sprinkle with additional Parmesan cheese. Bake for 25-30 minutes, or until golden brown.

    Once done, allow it to cool slightly before serving.

    Extra Tips:

    For an even more robust flavor, consider sautéing the minced garlic in olive oil before adding it to the dough. This will improve the garlic’s richness and add depth to the bread.

    Additionally, make sure that your water is at the right temperature to activate the yeast without killing it; too hot or too cold can affect the rise.

    For a more pronounced cheesy flavor, feel free to sprinkle more Parmesan on top before baking or even mix in some shredded mozzarella for added gooeyness.

    Enjoy your Garlic Parmesan Challah fresh or toasted with a bit of butter for a delightful treat!

    Rainbow Sprinkled Challah

    colorful festive braided bread

    Rainbow Sprinkled Challah is a delightful twist on traditional challah bread, perfect for celebrations or simply as a fun treat for the family. This colorful version adds a festive flair to the beloved braided bread, making it not only a visual delight but also a deliciously soft and sweet addition to your table.

    With its fluffy texture and sweet flavor, this challah is sure to bring smiles and joy to everyone who enjoys it.

    Ingredients:

    • 4 cups all-purpose flour
    • 1/4 cup granulated sugar
    • 2 teaspoons salt
    • 2 teaspoons instant yeast
    • 1/4 cup vegetable oil
    • 1 cup warm water (about 110°F)
    • 2 large eggs
    • 1 cup rainbow sprinkles
    • 1 egg (for egg wash)

    Instructions:

    In a large mixing bowl, combine the flour, sugar, salt, and instant yeast, mixing well.

    In a separate bowl, whisk together the warm water, vegetable oil, and eggs. Gradually add the wet ingredients to the dry mixture, stirring until a dough forms.

    Knead the dough on a lightly floured surface for about 8-10 minutes until it becomes smooth and elastic.

    Place the dough in a greased bowl, cover it with a clean kitchen towel, and let it rise in a warm place for about 1-2 hours or until it has doubled in size.

    Once risen, punch down the dough and divide it into three equal pieces. Roll each piece into a long rope, and then braid the ropes together, tucking in the ends.

    Place the braided challah on a baking sheet lined with parchment paper, brush it with the beaten egg for a shiny finish, and sprinkle with rainbow sprinkles.

    Allow it to rise again for about 30 minutes, then bake in a preheated oven at 350°F for 25-30 minutes or until golden brown.

    Extra Tips:

    For best results, make sure that the water temperature is warm but not hot, as overheating can kill the yeast.

    If you want to achieve vibrant colors in your sprinkles, consider using a mix of edible glitter or colored sugar as well.

    Additionally, you can customize your challah by adding flavors such as vanilla or almond extract to the dough for an extra layer of sweetness.

    Finally, storing your challah in an airtight container will help maintain its freshness for several days, but it’s best enjoyed the day it’s made!

    Vegan Challah

    vegan bread recipe instructions

    Vegan challah is a delightful twist on the traditional Jewish bread, offering the same soft, fluffy texture and beautiful braided appearance without any animal products. Perfect for celebrating special occasions or simply enjoying with a cup of tea, this vegan version uses plant-based ingredients to create a rich and satisfying bread.

    With a few simple substitutions, you can enjoy this beloved classic while complying with a vegan lifestyle.

    Ingredients:

    • 4 cups all-purpose flour
    • 1/4 cup sugar
    • 1 packet (2 1/4 tsp) active dry yeast
    • 1 cup warm water (about 110°F)
    • 1/4 cup vegetable oil
    • 1 tsp salt
    • 1 tsp ground cinnamon (optional)
    • 1/4 cup non-dairy milk (for brushing)

    Instructions:

    In a large mixing bowl, combine the warm water and sugar, then sprinkle the yeast over the top and let it sit for about 5-10 minutes until frothy.

    Add the vegetable oil, salt, and ground cinnamon (if using) to the yeast mixture. Gradually incorporate the flour, mixing until a dough forms.

    Knead the dough on a floured surface for about 8-10 minutes until it’s smooth and elastic. Place the dough in a lightly greased bowl, cover it with a clean cloth, and let it rise in a warm area for about 1-2 hours or until doubled in size.

    Once risen, punch the dough down, divide it into three equal portions, and roll each portion into long strands. Braid the strands together and place the braided dough on a lined baking sheet.

    Allow it to rise again for about 30 minutes. Preheat the oven to 350°F (175°C), brush the loaf with non-dairy milk, and bake for 25-30 minutes until it’s golden brown.

    Extra Tips:

    For best results, make certain your water is warm but not too hot, as high temperatures can kill the yeast.

    If you’re in a colder environment, consider placing the dough in an oven with the light on to create a warm environment for rising.

    You can also experiment with flavors by adding ingredients like raisins or nuts to the dough before braiding.

    Allow the challah to cool completely before slicing to guarantee it maintains its structure and texture. Enjoy your vegan challah fresh or toasted with your favorite spreads!

  • 10 Best Cheddar Bay Biscuit Recipes

    10 Best Cheddar Bay Biscuit Recipes

    Are you ready to enhance your cooking game with some delicious Cheddar Bay Biscuit recipes? These aren’t just your average biscuits; they’re packed with cheesy goodness and buttery flavor that’ll have your taste buds dancing. From spicy jalapeño twists to mini sliders, there’s a perfect recipe for everyone. So, whether you’re hosting a party or just craving a snack, you’ll want to stick around to discover which recipe will steal the show!

    Classic Cheddar Bay Biscuits Recipe

    If you’re craving the buttery, cheesy goodness of Cheddar Bay Biscuits, search no more! This classic recipe captures the essence of those beloved, flaky biscuits you often enjoy at seafood restaurants.

    With a simple mix of ingredients and a few easy steps, you can whip up a batch of these delightful treats that are perfect as a side dish or a snack on their own. Get ready to impress your family and friends with your baking skills!

    Ingredients:

    • 2 cups all-purpose flour
    • 1 tablespoon baking powder
    • 1/2 teaspoon salt
    • 1/4 teaspoon garlic powder
    • 1/4 teaspoon paprika
    • 1/2 cup cold unsalted butter, cubed
    • 1 cup shredded sharp cheddar cheese
    • 3/4 cup milk
    • 1/4 cup chopped fresh parsley
    • 1/4 cup melted butter (for brushing)
    • 1/2 teaspoon garlic powder (for topping)

    Instructions:

    Preheat your oven to 400°F (200°C) and line a baking sheet with parchment paper.

    In a large mixing bowl, whisk together the flour, baking powder, salt, garlic powder, and paprika. Add the cold cubed butter and use a pastry cutter or your fingers to mix until the mixture resembles coarse crumbs.

    Stir in the shredded cheddar cheese and parsley. Pour in the milk and mix until just combined—do not overmix.

    Using a spoon or ice cream scoop, drop dollops of the dough onto the prepared baking sheet, spacing them about 2 inches apart. Bake for 15-20 minutes or until the tops are golden brown.

    In a small bowl, combine the melted butter and garlic powder, and brush this mixture over the warm biscuits right after they come out of the oven.

    Extra Tips:

    For the best flavor, use freshly grated cheddar cheese instead of pre-shredded, as it melts better and has a richer taste.

    If you want to add a little kick, consider incorporating some chopped jalapeños or a pinch of cayenne pepper into the dough.

    These biscuits are best served warm, so enjoy them fresh out of the oven, but you can also reheat leftovers in the oven for a few minutes to regain their flaky texture.

    Pair them with your favorite soup or salad for a delicious meal!

    Garlic Herb Cheddar Bay Biscuits

    garlic herb cheddar biscuits

    Garlic Herb Cheddar Bay Biscuits are a delightful twist on the classic biscuit, perfectly infused with the flavors of garlic and herbs. These fluffy, buttery biscuits aren’t only easy to make but also a great accompaniment to soups, salads, or as a savory snack on their own.

    The combination of sharp cheddar cheese and aromatic herbs creates a deliciously rich flavor that will have everyone reaching for seconds.

    Ingredients:

    • 2 cups all-purpose flour
    • 1 tablespoon baking powder
    • 1/2 teaspoon salt
    • 1/2 teaspoon garlic powder
    • 1/4 teaspoon cayenne pepper (optional)
    • 1/4 cup unsalted butter, cold and cubed
    • 1 cup shredded sharp cheddar cheese
    • 3/4 cup milk
    • 2 tablespoons fresh parsley, chopped (or 1 tablespoon dried parsley)
    • 1 tablespoon garlic, minced
    • 2 tablespoons butter, melted (for brushing)

    Instructions:

    Preheat your oven to 425°F (220°C) and line a baking sheet with parchment paper.

    In a large mixing bowl, combine the flour, baking powder, salt, garlic powder, and cayenne pepper. Cut in the cold butter using a pastry cutter or your fingers until the mixture resembles coarse crumbs.

    Stir in the shredded cheddar cheese, parsley, and minced garlic. Pour in the milk and mix until just combined. Don’t overmix!

    Drop spoonfuls of the dough onto the prepared baking sheet, spacing them about 2 inches apart. Bake for 15-18 minutes or until the tops are golden brown.

    Once out of the oven, brush the warm biscuits with melted butter for an extra touch of flavor.

    Extra Tips:

    For the best results, make sure your butter is cold to create flaky layers in the biscuits.

    You can also experiment with different cheeses or herbs to suit your taste. If you want a more intense garlic flavor, consider adding roasted garlic to the dough.

    Serve these biscuits warm for the best texture and taste, and don’t hesitate to double the recipe if you’re expecting a crowd—they’re sure to disappear quickly!

    Cheddar Bay Biscuit Mix Copycat

    If you’re craving those delicious cheesy, buttery biscuits that you often find at seafood restaurants, you can easily make a copycat version at home using this Cheddar Bay Biscuit mix recipe.

    This quick and simple recipe combines the flavors of sharp cheddar cheese, garlic, and herbs, creating a savory treat that pairs perfectly with soups, salads, or as a snack on their own. With minimal ingredients and easy preparation, you’ll have warm, fluffy biscuits ready to enjoy in no time.

    Ingredients:

    • 2 cups all-purpose flour
    • 1 tablespoon baking powder
    • 1 teaspoon garlic powder
    • 1 teaspoon salt
    • 1/2 teaspoon paprika
    • 1/4 teaspoon cayenne pepper (optional)
    • 1 cup shredded sharp cheddar cheese
    • 1/4 cup cold butter, cubed
    • 3/4 cup buttermilk
    • 2 tablespoons melted butter (for brushing)
    • 1 teaspoon dried parsley (for garnish)

    Cooking Instructions:

    Preheat your oven to 425°F (220°C) and line a baking sheet with parchment paper.

    In a large mixing bowl, whisk together the flour, baking powder, garlic powder, salt, paprika, and cayenne pepper. Add the cold, cubed butter to the dry ingredients and use a pastry cutter or your fingers to blend until the mixture resembles coarse crumbs.

    Stir in the shredded cheddar cheese and then gradually add the buttermilk, mixing until just combined. Be careful not to overmix.

    Drop spoonfuls of the biscuit dough onto the prepared baking sheet, spacing them about 2 inches apart. Bake for 12-15 minutes or until the tops are golden brown.

    Once out of the oven, brush the tops with melted butter and sprinkle with dried parsley.

    Extra Tips:

    For an even more authentic flavor, consider adding a pinch of Old Bay seasoning or some finely chopped fresh herbs like chives or thyme to the dough.

    Make sure your butter is cold to achieve the best flaky texture in your biscuits. If you don’t have buttermilk on hand, you can substitute it by mixing 3/4 cup of milk with 1 tablespoon of lemon juice or vinegar and letting it sit for about 5 minutes.

    These biscuits are best served warm, so enjoy them fresh out of the oven or reheat them slightly before serving for that warm, buttery goodness!

    Spicy Jalapeño Cheddar Bay Biscuits

    spicy jalape o cheddar biscuits

    Spicy Jalapeño Cheddar Bay Biscuits are a delightful twist on the classic Cheddar Bay Biscuit, adding a kick of heat and a burst of flavor that will enhance your meal.

    These biscuits are perfect as a side dish for soups, stews, or alongside a hearty breakfast. With a combination of sharp cheddar, fresh jalapeños, and the signature buttery garlic flavor, these biscuits will quickly become a favorite in your household.

    Ingredients:

    • 2 cups all-purpose flour
    • 1 tablespoon baking powder
    • 1/2 teaspoon baking soda
    • 1 teaspoon salt
    • 1/2 teaspoon garlic powder
    • 1/4 teaspoon cayenne pepper
    • 1/2 cup cold unsalted butter, cubed
    • 1 cup shredded sharp cheddar cheese
    • 1/2 cup diced fresh jalapeños (seeds removed for less heat)
    • 3/4 cup buttermilk
    • 1/4 cup melted butter (for brushing)
    • 1/2 teaspoon dried parsley (optional, for garnish)

    Cooking Instructions:

    Preheat your oven to 425°F (220°C) and line a baking sheet with parchment paper.

    In a large mixing bowl, combine the flour, baking powder, baking soda, salt, garlic powder, and cayenne pepper. Cut in the cold butter until the mixture resembles coarse crumbs.

    Stir in the shredded cheddar cheese and diced jalapeños. Gradually add the buttermilk, mixing until just combined.

    Using a spoon or your hands, drop heaping tablespoons of the dough onto the prepared baking sheet, spacing them about 2 inches apart.

    Bake for 15-18 minutes or until the tops are golden brown. Once out of the oven, brush the warm biscuits with melted butter and sprinkle with parsley, if desired.

    Extra Tips:

    For an extra kick, consider adding a teaspoon of crushed red pepper flakes to the dough.

    If you want to make these biscuits ahead of time, you can prepare the dough and freeze it in portioned scoops. Just bake them straight from the freezer, adding a couple of extra minutes to the baking time.

    Additionally, feel free to adjust the amount of jalapeños based on your heat preference, and don’t hesitate to experiment with different cheese varieties for unique flavor profiles.

    Cheddar Bay Biscuits With Bacon

    Indulge in the savory delight of Cheddar Bay Biscuits with Bacon, a mouthwatering twist on the classic recipe that adds a rich, smoky flavor to the fluffy, cheesy biscuits. Perfect as a side dish or a standalone snack, these biscuits are easy to make and sure to impress your family and friends.

    The combination of sharp cheddar cheese, buttery goodness, and crispy bacon creates a delightful experience with every bite, making them an irresistible addition to any meal.

    Ingredients:

    • 2 cups all-purpose flour
    • 1 tablespoon baking powder
    • 1/2 teaspoon salt
    • 1/4 teaspoon garlic powder
    • 1/4 teaspoon onion powder
    • 1/2 cup cold unsalted butter, cubed
    • 1 cup shredded sharp cheddar cheese
    • 1/2 cup cooked and crumbled bacon
    • 3/4 cup buttermilk
    • 1/4 cup melted butter (for brushing)
    • 1 tablespoon chopped fresh parsley (for garnish)

    Instructions:

    Preheat your oven to 425°F (220°C) and line a baking sheet with parchment paper.

    In a large mixing bowl, combine the flour, baking powder, salt, garlic powder, and onion powder. Using a pastry cutter or your fingers, cut in the cold butter until the mixture resembles coarse crumbs.

    Stir in the cheddar cheese and crumbled bacon. Pour in the buttermilk and mix until just combined, being careful not to overmix.

    Drop spoonfuls of the dough onto the prepared baking sheet, spacing them about 2 inches apart. Bake for 12-15 minutes or until the tops are golden brown.

    Once out of the oven, brush the warm biscuits with melted butter and sprinkle with chopped parsley for added flavor and presentation.

    Extra Tips:

    For the best results, make sure your butter is very cold before incorporating it into the flour mixture; this helps create a flaky texture in the biscuits.

    If you want a more intense flavor, consider using a mix of cheeses, such as sharp cheddar and pepper jack. Feel free to experiment with additional spices or herbs to customize the flavor to your liking.

    Finally, these biscuits are best served fresh out of the oven, but they can be stored in an airtight container for a couple of days and reheated in the oven or microwave as needed.

    Enjoy your delicious Cheddar Bay Biscuits with Bacon!

    Gluten-Free Cheddar Bay Biscuits

    gluten free cheesy biscuits recipe

    If you’re craving the deliciousness of Cheddar Bay Biscuits but need a gluten-free option, this recipe is for you! These biscuits are fluffy, cheesy, and packed with flavor, making them the perfect side for your seafood dishes or a comforting snack on their own.

    With just a few substitutions, you can enjoy the same buttery goodness without the gluten. Let’s get started!

    Ingredients:

    • 2 cups gluten-free all-purpose flour
    • 1 tablespoon baking powder
    • 1 teaspoon garlic powder
    • 1/2 teaspoon salt
    • 1/4 teaspoon black pepper
    • 1/2 cup shredded sharp cheddar cheese
    • 1/2 cup cold butter, cubed
    • 3/4 cup milk (or dairy-free alternative)
    • 1/4 cup chopped fresh parsley (optional)

    Cooking Instructions:

    Preheat your oven to 425°F (220°C) and line a baking sheet with parchment paper.

    In a large mixing bowl, combine the gluten-free flour, baking powder, garlic powder, salt, and black pepper. Add the cubed butter and use a pastry cutter or your fingers to work it into the dry ingredients until the mixture resembles coarse crumbs.

    Gently stir in the shredded cheddar cheese. Pour in the milk and mix until just combined, being careful not to overwork the dough.

    Using a spoon or cookie scoop, drop heaping tablespoons of dough onto the prepared baking sheet, spacing them about 2 inches apart. Bake for 12-15 minutes, or until the tops are golden brown.

    Remove from the oven and brush with melted butter before serving.

    Extra Tips:

    For the best texture, make sure your butter is cold when you mix it into the dry ingredients. This helps create flaky layers in the biscuits.

    You can also experiment with different types of cheese or add spices like paprika for an extra kick.

    If you want to make these biscuits ahead of time, you can freeze the unbaked dough balls and bake them directly from the freezer, adding a couple of extra minutes to the baking time.

    Enjoy your gluten-free Cheddar Bay Biscuits fresh out of the oven!

    Cheddar Bay Biscuits With a Twist: Italian Seasoning

    italian flavored cheddar biscuits

    If you’re looking to spice up your traditional Cheddar Bay Biscuits, adding Italian seasoning is a fantastic twist that brings a burst of flavor and aroma to this beloved recipe.

    These biscuits combine the rich, cheesy goodness of cheddar with the herbal notes of Italian herbs, making them a perfect accompaniment to pasta dishes, soups, or even enjoyed on their own. The result is a delightful fusion that will have your guests asking for the recipe!

    Ingredients:

    • 2 cups all-purpose flour
    • 1 tablespoon baking powder
    • 1 teaspoon garlic powder
    • 1 teaspoon Italian seasoning
    • 1/2 teaspoon salt
    • 1/4 teaspoon black pepper
    • 1/2 cup cold unsalted butter, cubed
    • 1 cup shredded sharp cheddar cheese
    • 3/4 cup whole milk
    • 1/4 cup grated Parmesan cheese (for topping)
    • 2 tablespoons melted butter (for brushing)

    Instructions:

    Preheat your oven to 425°F (220°C) and line a baking sheet with parchment paper.

    In a large mixing bowl, whisk together the flour, baking powder, garlic powder, Italian seasoning, salt, and black pepper.

    Add the cold, cubed butter and use a pastry cutter or your fingers to work the butter into the flour mixture until it resembles coarse crumbs.

    Stir in the shredded cheddar cheese, then gradually add the milk until a soft dough forms.

    Drop spoonfuls of the dough onto the prepared baking sheet, spacing them about 2 inches apart.

    Sprinkle the tops with grated Parmesan cheese and bake for 15-20 minutes, or until the biscuits are golden brown.

    Once out of the oven, brush the tops with melted butter for a shiny finish.

    Extra Tips:

    For an even more pronounced Italian flavor, consider adding sun-dried tomatoes or chopped fresh basil to the dough.

    Make sure to use cold butter as it creates a flakier texture in the biscuits.

    If you want to adjust the level of seasoning, feel free to experiment with the amount of Italian seasoning to suit your taste.

    These biscuits are best enjoyed fresh, but you can also freeze the dough before baking for a quick treat later on—just bake them straight from the freezer, adding a couple of extra minutes to the cooking time.

    Cheddar Bay Biscuits With Ranch Dressing

    cheddar bay biscuits recipe

    Cheddar Bay Biscuits with Ranch Dressing are a delicious twist on the classic biscuit recipe, infusing the rich and zesty flavors of ranch dressing into fluffy, cheesy biscuits.

    Perfect for serving alongside soups, salads, or as a standalone snack, these biscuits are easy to make and will surely satisfy your cravings. With just a handful of ingredients and a few simple steps, you can whip up a batch of these savory delights that will impress your family and friends.

    Ingredients:

    • 2 cups all-purpose flour
    • 1 tablespoon baking powder
    • 1/2 teaspoon salt
    • 1/2 teaspoon garlic powder
    • 1/4 teaspoon onion powder
    • 1/2 cup cold unsalted butter, cubed
    • 1 cup shredded sharp cheddar cheese
    • 3/4 cup buttermilk
    • 1/4 cup ranch dressing
    • 1 tablespoon chopped fresh parsley (optional)

    Cooking Instructions:

    Preheat your oven to 425°F (220°C) and line a baking sheet with parchment paper.

    In a large bowl, whisk together the flour, baking powder, salt, garlic powder, and onion powder. Cut in the cold butter until the mixture resembles coarse crumbs. Stir in the shredded cheddar cheese.

    In a separate bowl, mix the buttermilk and ranch dressing until combined, then add this mixture to the dry ingredients. Stir until just combined, being careful not to overmix.

    Drop spoonfuls of the biscuit dough onto the prepared baking sheet, spacing them about 2 inches apart. Bake for 12-15 minutes or until the biscuits are golden brown.

    Extra Tips:

    For the best texture, make sure your butter is very cold when you cut it into the dry ingredients, as this will help create flaky layers in the biscuits.

    If you prefer a more intense flavor, consider adding some additional spices, such as paprika or cayenne pepper, to the dry ingredients.

    You can also brush the tops of the biscuits with melted butter immediately after they come out of the oven for an extra richness.

    Store any leftovers in an airtight container at room temperature for up to two days, or freeze them for longer storage.

    Mini Cheddar Bay Biscuit Sliders

    cheddar bay biscuit sliders

    Mini Cheddar Bay Biscuit Sliders are the perfect appetizer or party snack that combines the beloved flavors of Cheddar Bay biscuits with the fun of sliders.

    These bite-sized treats are fluffy, cheesy, and full of flavor, making them a hit at any gathering. Whether you’re serving them for game day or a casual get-together, these sliders will surely impress your guests and leave them asking for the recipe.

    Ingredients:

    • 2 cups all-purpose flour
    • 1 tablespoon baking powder
    • 1 teaspoon garlic powder
    • 1 teaspoon salt
    • 1/2 teaspoon cayenne pepper (optional)
    • 1/4 cup cold unsalted butter, cubed
    • 1 cup shredded sharp cheddar cheese
    • 3/4 cup buttermilk
    • 1 pound cooked chicken breast, shredded or sliced
    • 1/4 cup melted butter
    • 1 tablespoon chopped fresh parsley
    • 1/2 teaspoon garlic powder (for brushing)

    Cooking Instructions:

    Preheat your oven to 425°F (220°C) and line a baking sheet with parchment paper.

    In a large mixing bowl, whisk together the flour, baking powder, garlic powder, salt, and cayenne pepper. Add the cold butter and mix until the mixture resembles coarse crumbs. Stir in the cheddar cheese and then pour in the buttermilk until just combined.

    Drop spoonfuls of the dough onto the prepared baking sheet, forming mini biscuits. Bake for 12-15 minutes or until golden brown. Once baked, remove from the oven and allow to cool slightly before slicing the biscuits in half.

    Layer shredded chicken between the biscuit halves, then brush the tops with melted butter mixed with parsley and garlic powder.

    Extra Tips:

    For an extra kick, consider adding a layer of spicy aioli or sriracha sauce to your sliders before adding the chicken.

    You can also customize your sliders by using different proteins such as pulled pork or even veggies for a meatless option. If you’re short on time, feel free to use pre-made biscuits; just bake them according to package instructions and assemble the sliders as directed.

    Finally, these sliders are best served warm, so keep them in a warm oven until you’re ready to serve!

    Cheddar Bay Biscuit Pizza Bites

    cheddar bay biscuit bites

    Cheddar Bay Biscuit Pizza Bites are a delightful twist on the classic cheddar bay biscuit, combining the cheesy, buttery goodness of the original with the savory toppings of pizza.

    These bite-sized treats are perfect for parties, game days, or as a fun snack to enjoy any time. With a simple preparation process, you can have these delicious pizza bites ready in no time, making them a favorite among both kids and adults alike.

    Ingredients:

    • 2 cups all-purpose flour
    • 1 tablespoon baking powder
    • 1 teaspoon salt
    • 1/2 teaspoon garlic powder
    • 1/2 teaspoon onion powder
    • 1 cup shredded sharp cheddar cheese
    • 1/2 cup cold buttermilk
    • 1/2 cup pepperoni slices, chopped
    • 1/4 cup pizza sauce (for dipping)
    • 1/4 cup melted butter
    • 1 tablespoon fresh parsley, chopped (for garnish)

    Instructions:

    Preheat your oven to 425°F (220°C) and line a baking sheet with parchment paper.

    In a large mixing bowl, combine the flour, baking powder, salt, garlic powder, and onion powder. Stir in the shredded cheddar cheese and chopped pepperoni until evenly distributed.

    Pour in the cold buttermilk and mix until just combined, forming a sticky dough.

    Using a spoon or your hands, drop spoonfuls of dough onto the prepared baking sheet, spacing them a couple of inches apart.

    Bake for 12-15 minutes or until golden brown. Once out of the oven, brush the tops with melted butter and sprinkle with chopped parsley for added flavor.

    Extra Tips:

    For an even more flavorful experience, consider adding additional toppings like diced bell peppers, olives, or cooked sausage to the biscuit dough.

    If you prefer a spicier kick, sprinkle some crushed red pepper flakes into the mix.

    These biscuit pizza bites are best enjoyed fresh out of the oven, but you can store any leftovers in an airtight container for up to two days.

    Reheat in the oven or microwave before serving to regain that delightful softness. Pair them with various dipping sauces, such as marinara or ranch, for an extra layer of deliciousness!